‘Fang’tastic Halloween DIYs
Fangtastic Halloween DIYs
October 31, 2021
It’s almost Halloween, so you know what that means! It’s time to spice up this time of year with some eerie-sistable Halloween DIYS that will be fangtastic fun for everyone.
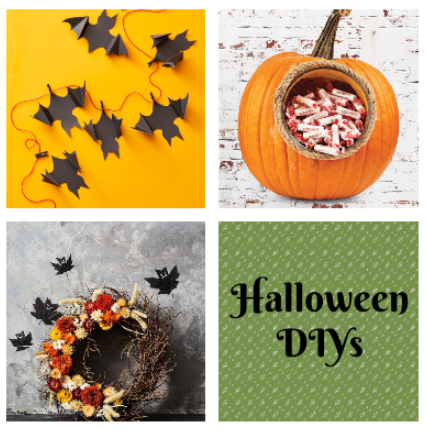
First up we have a simple and spooky way to decorate any area of your house: Paper Bat Garland. You will need:
- Black craft paper
- Bat Stencil
- Scissors
- Tiny black clothespins
- String/ string lights (optional)
You will start off by tracing your black craft paper with a bat stencil. You may free hand, trace offline, or download a free and printable stencil for repeated use! Once you’ve drawn or traced your bat, you will simply cut them out, and you’re already halfway done! If desired, you may fold your bat’s wings in order to make it 3D, witch will make it pop even more. Repeat as many times for as many bats as you’d like. Once your bats are fully complete, you will need to cut a long string to hang them up on. Once you have your desired string length, you may now add your bats to the string using your small black clothespins, and voila! You now have a ~bat to the bone~ decoration to hang wherever you want! Another option is to replace the string with lights. The process is all the same, but instead of a regular string, you can add your bats to a set of string lights for some extra flare. This decoration can be used all season, and many to come!
Next up, we have two decorations to use up all of the candy from Halloween’s past. Let’s be honest, we all have an old pillowcase filled with candy from last year, probably filled with your least favorite (it’s mostly Whoppers, don’t lie) leftovers. Instead of tossing it all, you can transform it into fun decorations for this season and many to follow. There is the Candy Wreath and the Pumpkin Candy Dispenser.
For the wreath you will need:
- A foam wreath frame
- Write ribbon, Yellow ribbon (or desired color)
- Hot glue
- CANDY!To start, you will grab your foam wreath frame, and begin wrapping your white ribbon around it, hot glueing to ensure it stays in place. Once you have fully wrapped the wreath, grab your candy and glue it on! Cover the entirety of it with candy (we suggest keeping fresh on hand for when you inevitably get hungry), making sure there are no spots of wreath visible. Finally, for the finishing touch, tie a cute bow out of your yellow ribbon, and glue it to the bottom or wherever desired. Now, you have a delicious decoration for any room or door you’d like to decorate!
For the pumpkin candy dispenser you will need:
- A pumpkin
- A bowl or storage container
- Carving kit or knife (please use caution!)
- A scooping spoon
- Rope
- Scissors and hot glue
- CANDY!
This is a little bit more of an advanced DIY, but anyone can accomplish it with some careful work. You will first begin by tracing an outline of the bowl you will be using onto the pumpkin. After you have your outline, begin to carve the shape of the outline into the pumpkin. Be extra careful when using the knife. Always cut away from your body. After you have cut out the outline, scoop the seeds from the pumpkin (pro tip: you can roast and eat these pumpkin seeds!). Once the pumpkin “guts” have been removed, insert your bowl or container into the hole you created, keeping in mind that you may need to slightly adjust the hole to adequately fit your container. Once that is in place, measure and cut your rope to outline the bowl, and hot glue it into place on the pumpkin. Now fill it with candy! Though this may be used solely for decoration purposes and using up spare candy, you also have the option of filling it with fresh candy to devour throughout the season! This candy dispenser can be placed anywhere, and is a gourd-geous edition to pumpkin-spice up the season!
And there you have it, these are three fun and affordable DIYs to make at home and are great activities for anyone, whether you are a first-time crafter or a seasoned pro!
A huge thank you to the lovely ladies at Goodhousekeeping, Amanda Garrity and Monique Valeris, and Charlene Mattox from CountryLiving for these simple and creative DIYS!